22. June 2023
OpenAI Embedding and Semantic Search With Redis

Semantic Seach with Typescript, OpenAI, and Redis
Most early searches - and even much of modern indexing strategies - ultimately boil down to a form of keyword search. Less advanced searches look for exact words, while newer algorithms use alternate word forms, stemming, and other ways to perform a "fuzzier" document search. A newer concept gaining traction is vector similarity search, which we can utilize with OpenAI's Embeddings. Vector similarity distills arbitrary information a large array representing a point in multidimensional space. By filling a database index with these points and calculating the distance between them we can perform a search that is not only highly efficient, but also allows for more expressive searches than simply finding the word or a near match. We can perform searches based on how closely the meanings of texts align.
While embeddings are not an unique concept, OpenAI's easy to use APIs and prebuilt models open the world of AI-powered software to a wide new range of software developers. In this article, we'll build a quick application in Typescript using the OpenAI Embedding API and RedisSearch in order to demonstrate how easy semantic searching can be.
If you'd just like to skip to the end and see or run the working code, I have a functioning demo available on Github.
Setup
If you plan on following along and running this code and don't have an OpenAI account yet, sign up for a free trial which will include more than enough credit for development and testing purposes. You'll also need to have a basic Typescript development environment set up, including Docker.
We're going to create a basic SvelteKit application. For simplicity, we won't be doing a lot of things required for a real "production ready" application - don't just copy this code verbatim! If you've never done it before, starting a new SvelteKit app is fast and easy:
1npm create svelte@latest my-app
2cd my-app
3npm install
4npm run dev
We'll add the rest from here. Let's get started with a pair of super basic forms on the root page, src/routes/+page.svelte:
1<h1>Vector embedding search</h1>
2<form id="add_form" method="post" action="?/add">
3  <label for="add_phrase">Add Phrase</label>
4  <input id="add_phrase" name="add_phrase" autocomplete="off" /><button type="submit">Add</button>
5</form>
6<form id="search_form" method="post" action="?/search">
7  <label for="search_phrase">Search Phrase</label>
8  <input id="search_phrase" name="search_phrase" autocomplete="off" /><button type="submit">Search</button>
9</form>
Note the action="?/search" - this is important to allow us to have two forms POSTing to the same endpoint with different code handling the request. There are of course many other ways to implement this with their own advantages, but for simplicity, we'll use this basic functionality.
Getting the embedding
When a user enters a phrase for either searching or adding to the index, we need to get the Embedding for that phrase. The embedding is, effectively, a large array of floats that represents the phrase's position in multidimensional space. Phrases semantically close to each other are close to each other in this multidimensional space, and we use this property to peform the semantic search. By getting the Embedding for each phrase we want to search over as well as the search phrase, we can easily find the closest semantic matches.
Connecting to OpenAI
First we'll need to do some boilerplate OpenAI API setup. You'll need an OpenAI API key first. We'll use SvelteKit's built in environment variable loading, so set the VITE_OPENAI_API_KEY in your .env file. Note that accessing the environment variables in this way must be done server side for security, which is enforced by putting this code in the /lib/server directory, see the Environment Variables tutorial for more. Here's how to get started:
 1// src/lib/server/openai.ts
 2import { Configuration, OpenAIApi } from 'openai';
 3
 4// OpenAI Setup
 5// Update MODEL_NAME if this is not the latest OpenAI embedding model
 6const MODEL_NAME = 'text-embedding-ada-002';
 7const OPENAI_API_KEY = import.meta.env.VITE_OPENAI_API_KEY
 8
 9const openaiConfiguration = new Configuration({
10    apiKey: OPENAI_API_KEY
11});
12
13const openai = new OpenAIApi(openaiConfiguration);
Making the Embedding Request
Next, a function to get the embedding vector from a given phrase. OpenAI returns a Float64 array, while Redis will expect a Buffer - we'll have to translate between them. This is the result of some trial and error on my part, so there may be simpler ways to do this.
 1// src/lib/server/openai.ts
 2export const getEmbeddingVector = async (phrase: string) => {
 3    // Get the embedding result from OpenAPI
 4    const embeddingResult = await openai.createEmbedding({
 5		model: MODEL_NAME,
 6		input: phrase
 7	});
 8    const embedding = embeddingResult.data.data[0].embedding;
 9
10    // Turn the result into a vector buffer that Redis understands
11    // This may be able to be simplified, but this took a lot of bashing my head as it is.
12    const vector_blob = new Blob([Float64Array.from(embedding)], { type: 'octet/stream' });
13	const vector = Buffer.from(await vector_blob.arrayBuffer());
14
15    return vector;
16}
That's it for the OpenAI API side - pretty simple! The most difficult part was translating between OpenAI and Redis; hopefully this will save someone some trouble down the line.
Storing the Embedding
Now that we have the embedding vector and have translated it into a format Redis can understand, it's time to insert it into the Redis index. Note that the ability to index and search Redis in a vector distance field like this is part of the RedisSearch optional module - if you plan on deploying this, you'll need to ensure that whatever Redis provider you choose has RedisSearch support. Many of the free or cheap options do not, though the official Redis Cloud's free tier does in a very limited capacity.
Connecting to Redis
We'll need to get a Redis client connection first, this is completely standard. As long as you're connecting to a Redis server with the RedisSearch module installed and active, any mean of getting a connection is fine. I use a client singleton with a getter function as it seems to work well in a serverless context - the connection is not opened until it is needed, but will last as long as the executor does in the event it is reused.
 1// src/lib/server/redis.ts
 2import { createClient, SchemaFieldTypes, VectorAlgorithms, type RedisClientType } from 'redis';
 3
 4// Load Redis connection info from environment
 5const VECTOR_REDIS_PORT = import.meta.env.VITE_VECTOR_REDIS_PORT ? Number(import.meta.env.VITE_VECTOR_REDIS_PORT) : undefined;
 6const VECTOR_REDIS_PASS = import.meta.env.VITE_VECTOR_REDIS_PASS;
 7const VECTOR_REDIS_CONN = import.meta.env.VITE_VECTOR_REDIS_CONN;
 8
 9// Vector dimension as returned by OpenAI
10const VECTOR_DIM = 1536;
11
12// Search index information
13const INDEX_NAME = 'idx:search-vector-index';
14const INDEX_PREFIX = "search-index"
15const NUM_RESULTS = 5;
16
17let redis: RedisClientType;
18
19// Get redis client singleton
20const getRedis = async (): Promise<RedisClientType> => {
21    if (!redis) {
22        redis = createClient({
23            password: VECTOR_REDIS_PASS,
24            socket: {
25                host: VECTOR_REDIS_CONN,
26                port: VECTOR_REDIS_PORT
27            }
28        });
29        await redis.connect();
30    }
31    return redis;
32};
Creating the cosine distance search index
Once the Redis connection is established we can also create the index if it does not exist yet. In a production application you might not want to have this verification and creation code as part of the running application (certainly not part of every request as we will do) and instead verify as part of your CI/CD process or elsewhere. For now, this is an easy way to ensure the index is created locally.
 1// src/lib/server/redis.ts
 2
 3// Create index if it doesn't already exist
 4const createIndex = async () => {
 5    const client = await getRedis();
 6
 7    try {
 8        await client.ft.create(INDEX_NAME, {
 9            // We need to store the phrase in the index, as that is what we want to get back out. You can store other data if you wish.
10            phrase: {
11                type: SchemaFieldTypes.TEXT
12            },
13            // The embedding is stored as a Float64 vector with appropriate
14            // configuration to allow it to be searchable via the cosine distance metric
15            embedding: {
16                type: SchemaFieldTypes.VECTOR,
17                ALGORITHM: VectorAlgorithms.HNSW,
18                TYPE: 'FLOAT64',
19                DIM: VECTOR_DIM,
20                DISTANCE_METRIC: 'COSINE'
21              }
22        }, {
23            ON: 'HASH',
24            PREFIX: INDEX_PREFIX
25        });
26        console.log("Index created")
27    } catch (e: any) {
28        if (e.message === 'Index already exists') {
29            // If it already exists, no problem.
30            console.log('Index already exists');
31        } else {
32            // If any other error (probably bad connection information) log it and shut down for simplicity
33            console.error(e);
34            process.exit(1);
35        }
36    }
37}
Adding a phrase to the index
Now that we have the embedding and a function to connect to Redis and create the index, we can add the embedding to the index. We'll need to generate a key for the phrase. In this case we're just using a sha256 hash of the phrase itself, but there may be reasons to generate different keys. We store both the embedding used to calculate the cosine distance and the phrase, so that we can present the phrases as the search results. You can add other information as well: For example, if you are searching over documents, you could include document IDs, authors, etc - anything you may want returned in the query. Note however this does mean the index will be correspondingly larger.
 1// src/lib/server/redis.ts
 2
 3// Add phrase and associated embedding vector to the Redis search index
 4export const addPhrase = async (phrase: string, vector: Buffer) => {
 5    const client = await getRedis();
 6    await createIndex();
 7    // Create a hash id for this phrase
 8    // Don't just use the phrase itself - Redis keys should be short
 9    const phraseId = crypto.createHash('sha256').update(phrase).digest('hex');
10    const key = `${INDEX_PREFIX}:${phraseId}`;
11    const mapping = {
12        "phrase": phrase,
13        "embedding": vector
14    };
15
16    client.hSet(key, mapping);
17}
Writing the add phrase form action
We now have enough code to add the phrase to the index successfully, we just need to write the form action. Instead of basic HTML forms, this information could easly come through an API, a websocket, from files on disk, or any other means you can work up. We will be using SvelteKit's named actions to allow multiple actions through one POST handler.
 1// src/routes/+page.server.ts
 2import type { RequestEvent } from "./$types";
 3import { getEmbeddingVector } from "$lib/server/openai";
 4import { addPhrase } from '$lib/server/redis';
 5
 6
 7// Get embedding vetor for phrase and add it to Redis
 8const addMatch = async (phrase: string) => {
 9  const embeddingVector = await getEmbeddingVector(phrase);
10  await addPhrase(phrase, embeddingVector);
11}
12
13// Expose possible form actions for the route
14export const actions = {
15    add: async ({request}: RequestEvent) => {
16        const data = await request.formData();
17        const phrase = data.get('add_phrase') as string;
18
19        await addMatch(phrase);
20
21        return { success: true, phrase };
22    }
23};
Add some code to the root page template to show a simple success message.
1{#if form && form.success}
2  {#if form.phrase}
3    <p>Successfully added {form.phrase}</p>
4  {/if}
5{/if}
You should now be able to successfully add phrases to the index!
Searching for Phrases
Now that we can add phrases and their embedding vectors, we can utilize RedisSearch to efficiently perform the cosine distance search between an input vector and all indexed phrases. We'll need to generate the embedding for the search phrase, then query Redis with a K-Nearest neighbors (KNN) vector similarity search. The mathematics behind this search are complicated, but not something we need to worry ourselves with for a simple application. At a very high level, it considers each of the vectors as a point in 1536-dimensional space, and uses an algorithm to find the nearest points to each other. Because the embedding vector is a representation of semantic attributes of the input phrases, this means that vectors close to each other in this space are closely related semantically. (That's the theory, anyway - sometimes it gets a bit bungled up!)
 1// src/lib/server/redis.ts
 2export type SearchResult = {
 3	phrase: string;
 4};
 5
 6// Find phrase closest to given embedding vector
 7export const searchPhrases = async(vector: Buffer): Promise<SearchResult[]> => {
 8
 9
10    // Get redis and create index if it doesn't exist, just to simplify logic
11    const client = await getRedis();
12    await createIndex();
13
14    // Query for nearest NUM_RESULTS
15    // Adapted from OpenAI example
16    // https://github.com/openai/openai-cookbook/blob/main/examples/vector_databases/redis/redisqna/redisqna.ipynb
17    const redis_query = `*=>[KNN ${NUM_RESULTS} @embedding $vector AS vector_score]`;
18
19    let redis_results;
20	try {
21		redis_results = await redis.ft.search(INDEX_NAME, redis_query, {
22			SORTBY: {
23				BY: 'vector_score',
24				DIRECTION: 'ASC'
25			},
26			RETURN: ['phrase'], // If you stored other information in the index and want it returned, add it here
27			DIALECT: 2,
28			PARAMS: { vector } // This is passed in to redis and replaces the $vector in the query.
29		});
30	} catch (e) {
31		console.error('Error querying redis:', e);
32	}
33
34    // Process results for presentation
35	if (redis_results) {
36		return redis_results.documents.map((r) => r.value) as SearchResult[];
37	} else {
38		return [];
39	}
40
41}
Hooking up the search form
With the index search function, we can now hook up the search form and display results in a basic format. Add the following to the existing add form action code:
 1// src/routes/+page.server.ts
 2import { type SearchResult, addPhrase, searchPhrases } from '$lib/server/redis';
 3
 4// Get embedding vector for phrase and search for it in Redis
 5const findMatches = async (phrase: string): Promise<SearchResult[]> => {
 6  const embeddingVector = await getEmbeddingVector(phrase);
 7  return await searchPhrases(embeddingVector);
 8}
 9
10export const actions = {
11    /* ... snip add action ... */
12    search: async ({request}: RequestEvent) => {
13        const data = await request.formData();
14        const phrase = data.get('search_phrase') as string;
15
16        const results = await findMatches(phrase);
17
18        return { success: true, results, phrase };
19    }
20};
Update the src/routes/+page.svelte to show the results if they are available, replacing the existing message code added earlier:
 1{#if form && form.success}
 2  {#if form.results}
 3  <p>Results for {form.phrase}:</p>
 4  <ol>
 5    {#each form.results as result}
 6      <li>{result.phrase}</li>
 7    {/each}
 8  </ol>
 9  {:else if form.phrase}
10    <p>Successfully added {form.phrase}</p>
11  {/if}
12{/if}
You now should be able to search your added phrases. Note that this is a trivial distance search that will always return the 5 closest results, regardless of how close the results actually are. Advanced use cases may want to build some form of filtering on top of these results.
Conclusions
Using semantic search, you can now search for more than just matching words, or even similar words. You can search for a deeper meaning powered by the large language model's understanding provided by the AI training. As test examples, I loaded up an index with various objects including mostly bits of clothing, then searched it for various situations. Here's the results for "construction worker":
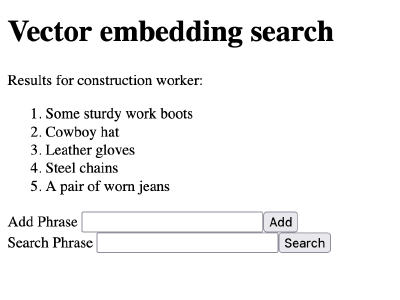
You can see that it gives items generally strongly related to construction workers. This includes "steel chains" which of course are related to construction in general, but very different than the other options which are mostly items worn by the worker. Let's see what happens when we instead search for "construction worker clothing":
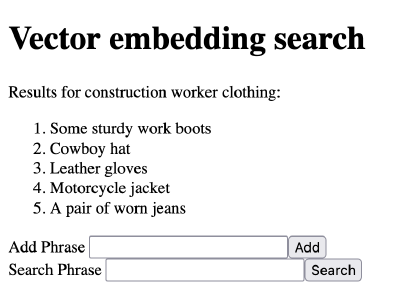
You can see there is no longer "steel chains" but now includes "motorcycle jacket" which, given the options I provided the index, would conceivably be a reasonable option for a construction worker to wear. Given no specific training, the pre-trained OpenAI models know that a motorcycle jacket (and the other items) are clothing.
With this code and examples, you should now be able to see not only how powerful, but how simple it is to set up and use semantic text searching with Typescript, OpenAI, and RedisSeach. I don't claim expertise in AI techniques nor that this particular strategy is the best way to use the tools available, I simply want to showcase that utilizing these tools is not just possible but easy to get reasonably good results using the Javascript stack. Many of the existing examples of semantic OpenAI searching are using Python and were referenced in the building of this code, hopefully my Typescript translations will be useful for future engineers' exploration and development.
To see all the code used in this post, check out the functioning demo available on Github.
Looking for more individual instruction? I'm available as a mentor at Mentorcruise for one on one guidance!